Tuesday, December 16, 2014

How to Retrieve Deleted Whatsapp Messages on iPhone


Can I retrieve deleted WhatsApp messages on iPhone?
Is it possible to recover deleted messages back to my iPhone? I have accidentally deleted some images and audio media messages received from my client. The lost messages are very important for me. I'm looking for recovery tool. Does anyone know?

Well, it's quite easy to recover data from iPhone as long as you have good data-recovery software. iPhone Data Recovery is a reliable and professional tool many users strongly recommended.

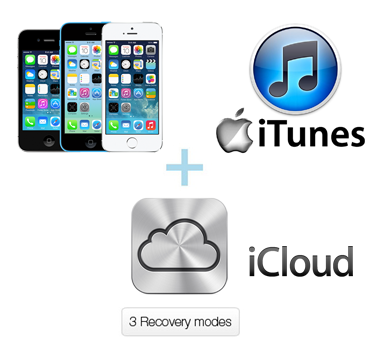
iPhone Data Recovery has become one of the most downloaded apps due to its applicability to all situations. No matter in what situation you lost your data, virus attack, system crash or device damage, iPhone Data Recovery can help you recover data in three simple ways. Now the article will give you detailed tutorial on how to use this software.

Download the free trial version below to have a try.

           
Solution 1: Directly scan your iPhone to recover deleted WhatsApp messages

Step1. Connect iPhone to Computer & Scan iPhone for Data

Launch the program on your computer and connect your iPhone to your computer.
For iPhone 6Plus/6/5S/4S users:
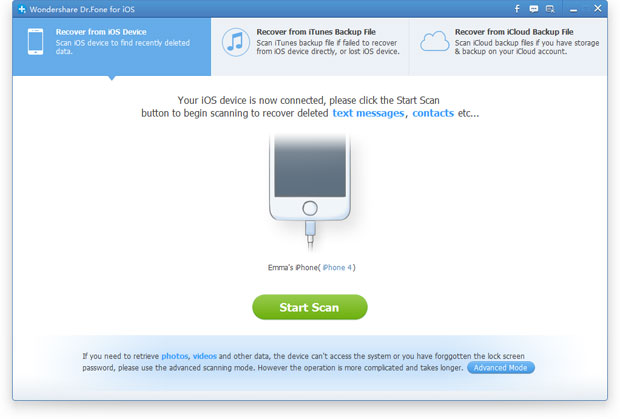
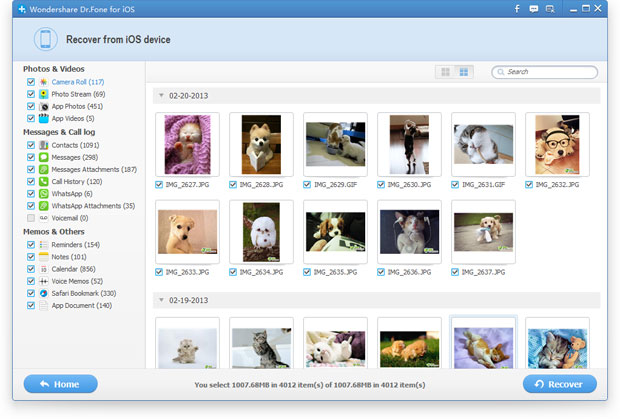
The following window will appear. Choose the recovery mode "Recover from iOS Device" and click "Start" button to scan your data on your cellphone.


For iPhone 4/3GS users:
You should follow the next three steps to make your iPhone enter scanning mode.
1.Click "Start" button.
2.Pressing "Power" and "Home" buttons at the same time for exactly 10 seconds. The software will count down for you.
3.After 10 seconds, release "Power" button, but keep holding "Home" for another 10 seconds.
After another 10 seconds, your iPhone will successfully enter the system, and now you can release the Home button now. The program will automatically scan your iPhone.


Step2. Preview & Recover WhatsApp Messages

The following screenshot image shows the scanning processes. After it completes, data will be found and displayed in categories. Slide the small button at the top of the windows to "On" to only display deleted items. Choose "WhatsApp", and you can read the whole messages including attachments and emoji before recovery. Tick off those you want and click "Recover".
That's all of the steps.


Solution 2: Extract Whatsapp Messages from iPhone iTunes Backup File

Step1. Extract Data from iTunes Backup Files

Firstly, make sure you had synced your iPhone with iTunes before you lost the WhatsApp messages. iPhone Data Recovery enables you to selectively recover any parts of data in iTunes backup file.
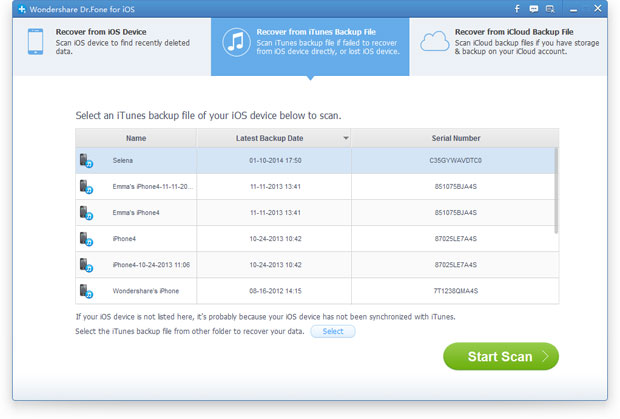
Launch the program and choose "Recover from iTunes backup file". There will be some iTunes backup files appearing in the windows. Select an iTunes backup file of your iPhone to scan your lost data.


Step 2 Preview & Recover Deleted WhatsApp Messages

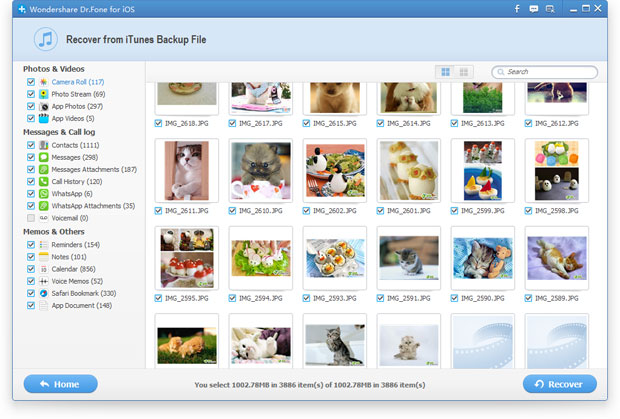
When the scanning stops, all data will be found and displayed in the window. You can see all the contents of your iPhone listed in the window. Choose "WhatsApp" in the left column, preview and recover your deleted WhatsApp messages.


Solution 3: Extract WhatsApp Messages from iCloud Backup File for iPhone

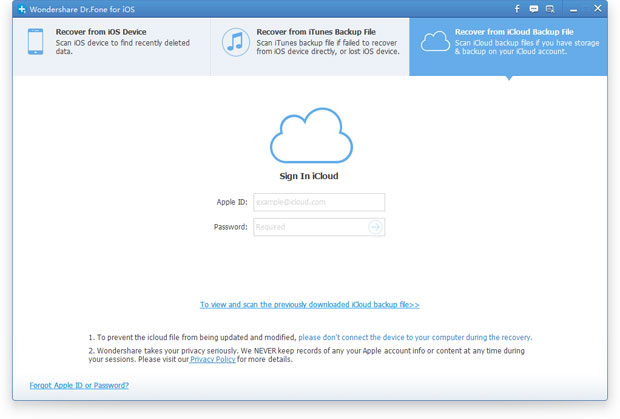
Step1: Sign in iCloud Account & Choose backup file to download

Firstly, make sure you had synced your iPhone with iCloud before you lost the WhatsApp messages. iPhone Data Recovery enables you to selectively recover any parts of data in iClould backup file.
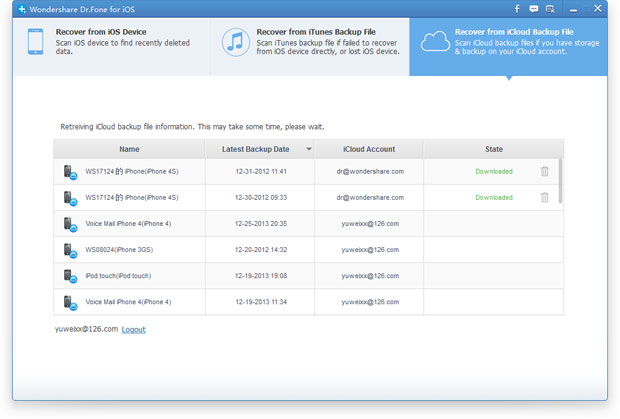
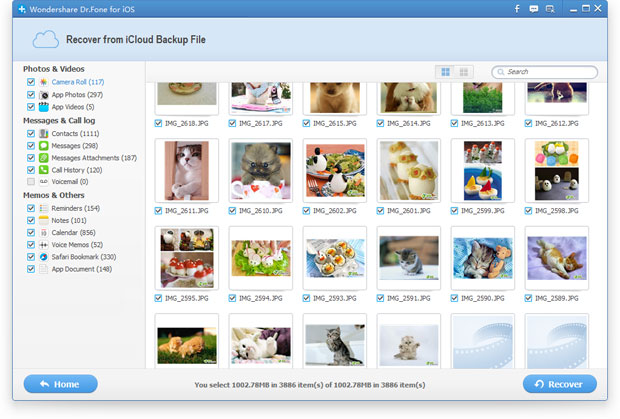
Launch the program and choose "Recover from iCloud backup file". Log in your iCloud account and there will be some iCloud backup files appearing in the windows. Select an iCloud backup file of your iPhone and click "download".


Step2: Preview & Recover Deleted WhatsApp Messages

Click "Scan" to detect files in iCloud backup file to retrieve deleted WhatsApp messages. You can selectively retrieve data from iCloud backup file. After the process is finished, click WhatsApp in the left sidebar to preview your chat history. Check the one you need and click "Recover" to recover WhatsApp messages to your computer.

---------------------------------------------------------------------------------
More related articles:
How to recover deleted or lost data from Samsung mobile phone
How to Permanently Erase Data from iPhone Before Selling


Monday, December 15, 2014

How to recover deleted or lost data from Samsung mobile phone


Want to recover your Samsung data in a simple way? Accidentally deleted messages or contacts on your Samsung handset? Or lost photos from the SD card on your Android device?

You can see Samsung Galaxy phone and other devices anywhere since they were launched. Because it has a big screen, excellent performance, powerful configuration, and so on, so that you love it at hand, making telephone calls, surfing the Internet, chatting with your friends or family, playing games, watching video, taking photos, etc., your Samsung Galaxy is almost all of you. However, when you enjoy the fun of it, accidents are likely to follow, the most prominent problem is the loss of your data. You may loss your data due to accidentially deletion, rooting, restoring to factory settings, formated and some unforeseen situations, if you get a backup, you may can get back some of your data, good fortune of the misfortune! While if you don't have any backup file, it means you lost the data for ever if at the past, but now, you can also recover by using a tool which named Android Data Recovery, as long as your missing data is not overwrote by the new data.

Don't worry! Android Data Recovery program can solve your problem. As the deleted files still remain intact until that data is not overwritten by any new data, you can get back your Samsung files. If you stop using your device immediately after losing your data, the data still can be recovered with the aid of an android data recovery software. Android Data Recovery is a secure and powerful tool that can be used to restore your lost photos, videos, contacts and messages from all kinds of Samsung device, including Samsung phones and tablets, Samsung Captivate, Samsung Galaxy Ace, Samsung Galaxy Note, Samsung Infuse, Galaxy Nexus, Samsung Epic 4G Touch, and more.


4 Simple Steps to Recover Deleted or Lost Data from Your Samsung Galaxy Devices

Step 1: Launch the recover tool and connect your Samsung to PC

Download, install and run Android Data Recovery tool on the computer, and then connect your Samsung phone to your computer via the USB cable.

Step 2. Enable USB debugging on your Samsung Device

When the program detects your phone, it requires you to enable USB debugging. There are three options. Please choose the one for your phone's Android OS.
1) For Android 2.3 or earlier: Enter "Settings" < Click "Applications" < Click "Development" < Check "USB debugging"
2) For Android 3.0 to 4.1: Enter "Settings" < Click "Developer options" < Check "USB debugging"
3) For Android 4.2 or newer: Enter "Settings" < Click "About Phone" < Tap "Build number" for several times until getting a note "You are under developer mode" < Back to "Settings" < Click "Developer options" < Check "USB debugging" 


Step 3: Analyze and Scan your Samsung phone for lost data

After your Samsung phone is successfully detected by the program, make sure that your phone battery is more than 20% to enable the follow steps. Then click "Start" button to let the program analyze the file on your device.
                             

Step 4. Preview and recover lost data from Samsung Galaxy

After the scan, a list of recoverable files that have been found from your Samsung will be shown. Moreover, there will be a preview window of files for you to preview the messages, contacts, and photos from Samsung device before recovery. You can choose the data you want and click "Recover" button to save them on your computer.
                                        

Saturday, December 13, 2014

How to Recover Deleted Call History on iPhone


Accidentally remove important call history from your iPhone? Go out of your way to recover lost data but finally fail? A savior of lost data access for all cell phone subscribers is here! Read on!

Many iPhone users have met the same problems. Don't worry because it's probable to restore all your data from your iPhone. Actually, your call history has not yet permanently removed from your iPhone. They are present in some corner of your iPhone waiting for you to pull them out. How? Just use iPhone Data Recovery!

iPhone Data Recovery is a reliable data recovery tool that can efficiently help your restore data (pictures, videos, calendar, call logs, contacts, etc) from your iPhone. No matter how did you lose your data, device damage, accidental deletion, virus inflection, system error, formatting, etc, trust me! iPhone Data Recovery can help you easily recover them without any damage.

Do not hesitate and miss this chance! Download the trial version to save your call logs now.

         
Three ways to recover call history from iPhone

Part 1: Directly Recover Call History from iPhone

Step 1 Connect device to PC & Choose recovery mode

Free download iPhone Data Recovery, install and launch it. Connect your iPhone to your computer via USB. Then you'll see three recovery modes in the interface as the image shows below. Choose "Recovery from iOS Device". After that, click "Start Scan" to scan information of your iPhone.


Step 2 Preview content & Recover lost call history

After a while, when scanning is completed, you'll see all contents of your iPhone are list in the next window. You can slide the button at the top of the window to "On" for only displaying the missing items so that you can easily find out your lost call history. Preview the items and recover those you need by clicking "Recover" button.

Part 2: Recover iPhone Call History from iTunes backup

iTunes itself does not allow you to selectively restore data from it. All or nothing, it means you can either restore everything from iTunes backup files or restore nothing from it. It's quite inconvenient for users. With this in mind, iPhone Data Recovery enable users to choose whatever they want from iTunes backup file and save them to their devices. Follow the steps: 

Step 1 Choose recovery mode & Extract iTunes backup file 

Launch iPhone Data Recovery on your computer and choose "Recover from iTunes Backup File". Here you'll see all iTunes backup files for your iOS devices. Choose the one for your iPhone and click "Start Scan" to extract it. If there is more than one, choose the one with the latest date.
                                      

Step 2 Preview & Recover iPhone call log from iTunes backup

Wait for a while until all contents appear in the window. Now you can choose "Call History" in the left column and preview them. Tick the item you want to keep and save it to your computer by clicking the "Recover" button.

Part 3: Restore iPhone Call History from iCloud backup

Without iPhone Data Recovery, if you want to recover data from iCloud backup, you will meet the same problem as from iTunes backup. iCloud restrains you from previewing or selective restoring specific data from its backup files. Likewise, you need iPhone Data Recovery to help you extract data out of iCloud backup files. Now follow the bellowing steps: 

Step 1 Run the program & Sign in your iCloud account

Launch the program after installing it and switch to the third recovery mode as the screenshot below shows "Recover from iCloud Backup". Then log in your iCloud by entering Apple ID and password.

Note: It's safe to log in your account in this interface because iPhone Data Recovery will not record or divulge any information.


Step 2 Download & Scan the iCloud backup

After logging in iCloud, iPhone Data Recovery can detect and list all of your iCloud backup files in the window. Select the one you need and click "Download" button. The downloading process will take you a few minutes.

Note: The downloaded file is only located on your computer. There is no record in the program or any other place.


Step3. Preview and restore call history from iCloud

As the following screenshot shows, all of the contents are itemized in the left pane of the window so that you can preview most of them. Then choose those you need and click "Recover" to retrieve your call logs.

---------------------------------------------------------------------------------
More related articles:
How to Permanently Erase Data from iPhone Before Selling

Thursday, December 11, 2014

How to Permanently Erase Data from iPhone Before Selling


Early this morning, I got a few emails from my reader asking how to remove private data stored on iPhone permanently before selling. They also put emphasize on the word ‘permanently’ as none of them are willing to get their privacy being leaked with the help of third-party data recovery software. I still remembered that my personal photos were posted on Facebook at someone’s account, those photos came from the old device I sold online. I was pretty sure that the photos were deleted with the method provided by Apple: Erase All Content and Settings.

Research has shown that most of the mobile phones and smart phones are selling online with containing plenty of personal private data. This really is shocking! This is not just prove that the original users are not aware of the personal data will be leaked out, they don’t care to remove private information, it also because we don’t adapt the correct method to completely eliminate data from iPhone device. If you were smart enough and took a step forward, then you will find out that Erase All Content and Settings is not going to delete the data permanently. The data is still on your old iPhone unless it was overwritten by other digits. Fortunately, there is an app called iPhone Data Eraser which is developed with the aim to delete everything permanently on iPhone in a simple way.

iOS Data Eraser is a powerful data wiping tool that provides a much secure way to help you remove personal data on your iPhone. It writes a random set of digits to your iPhone a few times by utilizing the latest patent-protected algorithms. The data is absolutely non-recoverable even by FBI agents. So your privacy is under safe for sure when you give or sell the device to whomever.


Tutorials: Completely Erase iPhone Data without Restore
Step 1.Install iPhone Data Eraser on Your Computer

iPhone Data Eraser is across platform app that supports both Windows and Mac OS X. Download the file according to computer’s operating system via above download links. Then install the program on your computer like normal installation. The program will be opened automatically when installation is completed.


Step 2.Connect iPhone to PC and Choose Erasing Option

Plug your iPhone to the computer with the program installed. And make sure iTunes was installed previously. Currently, there are 4 data erasing modes with the program. "Express Cleanup" "Erase Private Data" "Erase Deleted Files" and "Erase All Data". You may not know simple deletion is not far enough, in this case, choose "Erase Deleted Data" from the sidebar, which will completely erase all deleted data on your device, including photos, logins, caches, contacts, etc…


Step 3:Analyize, Scan the Deleted Data and Start to Erase Them

The program starts scanning the data stored on your iPhone when you input Delete. It will take a few minutes for scanning. When scan is completed, it will remove all data and settings on your device. The entire process will be finished under 25 minutes depending on how many files on your iPhone.


Deleting information or factory reset on your mobile phone does not mean that it is erased completely. There are a million programs that can fetch data back from a deleted memory or internal memory. As far as I know, iOS Data Eraser is the best option for secure data deletion for any iOS powered device, no matter it’s an iPhone, iPad or iPod Touch. You can test the result with some of the data recovery software to see whether your personal data is recoverable or not. What’s more, you can even choose to just remove only a kind of data separately, like browser caches, history, notes, contacts, etc…

--------------------------------------------------------------------------------
More related articles:
How to Recover Deleted Videos from iPhone How to Recover Deleted Text Messages on iPhone


Wednesday, December 10, 2014

How to Recover Deleted Videos from iPhone


The iPhone users often buy the wonderful videos which are available on the Apple Store. However, the videos can often get deleted accidentally when someone touches the screen in the unlocked position. The iPhone can also suffer from serious consequences in situations like jailbreak, iDevice damage, and iOS update. The users often panic in such situations and cannot determine the possible way out.

If you want to retrieve your previous data lost due to virus attack, system crash, device damaged and so on, this article would be very useful for you. Read on.

iPhone Data Recovery can solve your problems about data recovery from Apple devices, iTunes backup files and iCloud backup files. The main characteristics of this software are easy-to-use operation interfaces and powerful functions which enables you to recover the deleted data through simple steps. It's professional data recovery software for iPhone 6 plus/6/5s/5c/4S/4/3GS. Here, I will present to you how to recover data without iTunes backup.

Download the free trial version below to have a try.


Three Solutions to Save Your Deleted Videos from iPhone 6 Plus/6/5S/5C/5/4S/4/3GS

Solution 1: Recover Deleted Video Directly from iPhone

Step 1 Launch the software & Scan data on iPhone
Run the iPhone Data Recovery on your computer, and connect your iPhone to the computer with a USB cable.

For users of iPhone 6 Plus/6/5S/5C/4S:
After your phone is successfully connected, you can directly scan it for data.

For users of iPhone 4/3GS:
You need to enter the scanning mode by following the description below:
1. Click the Start button.
2. Hold Power and Home buttons at the same time for exactly 10 seconds.
3. After 10 seconds, release the Power button. Keep pressing the. Home button for about 10 seconds, and then release it.
Now your devices will be automatically scanned and the lost data will be displayed soon.


Step 2 Preview & Recover deleted videos from iPhone

After the scan, all the content in your iPhone will be displayed in the window. On the left side, you can see items, such as Camera Roll, Photo Stream, Contact, Messages, Call logs, etc. You can also slide the button at the top of the window to "On" to only display your lost data. Then preview, choose what you want and click "Recover" to undelete your data.
                                     

Solution 2: Recover Videos for iPhone through iTunes backup

Step 1 Extract data from iTunes backup file

Install and run the program on your computer. Then connect your iPhone to your computer. Then choose the recovery mode "Recover from iTunes backup files" in the window. Click "Start Scan" to scan and extract data from iTunes backup files.


Step 2 Recover deleted iPhone videos

After scanning, data in your iTunes backup file will be displayed in the next window where you can preview all of your videos. Choose the option of "Video" on the left side and find the one you need to restore and recover them by clicking "Recover".


Solution 3: Restore Videos through iCloud Backup

Step 1 Extract data from iCloud backup file

Run the software and choose the option of "Recover from iCloud Backup File". Then log in your Apple ID. All iCloud backup files will be shown in the window. Download the one you need to extract data from iCloud backup file.


Step 2 Recover deleted iPhone videos from iCloud

Now you can see all the contents of your iPhone listed in the window. Choose "Video" in the left column, preview and recover your deleted videos.


Backing up your data regularly to your computer, iTunes backup file or iCloud backup file can effectively protect your data from losing.

More related articles:
How to Recover Deleted Photos from iPhone
How to Recover Deleted Text Messages on iPhone


Friday, December 5, 2014

How to Recover Deleted Photos from iPhone


You deleted photo accidently? Erase all your photos by clear up the storage space of your iPhone? Want to recover my photos immediately? It's time for Recovery Expert to help. There are there ways to solve this problem. It’s not difficult at all, as long as you follow the guide below, even you lost your phone. Check it out!

iPhone Data Recovery can recover deleted photos from iPhone. It actually supports most Apple products—iPhone 6/6 Plus/5 and all kinds of iPad. Check to download the tool first.


Use iTunes backup to recover pictures from iPhone 6 Plus/6/5S/5C/5/4S/4/3GS

Step 1: Choose iTunes backup and scan it.

When you run the program on your PC, click "Recover from iTunes Backup File" on the top as the screen shot below. Choose the iTunes back up of your iPhone, if there are more than one back up, choose the "Latest Backup Data" and click "Start Scan".


Step 2: Recover from iTunes Backup File

After the scan is finished, all files in the backup file will be displayed for you to choose. You can preview the pictures both from camera roll and transferred from somewhere else. Mark all those you want and "Recover" it to save them to your computer.


The data extracted from backup file involve existing one and deleted before. You can separate them by chosen "Only display the deleted items".

------------------------------------------------------------------------------------------------------------------------------------------------------------------
More related articles:

How to Recover Deleted Text Messages on iPhone


How to Recover Deleted Text Messages on iPhone

Is there any way to restore text messages on iPhone? I had my iPhone repaired last week, but I forgot to back up the text messages. The repairman told me that data of my iPhone had been wiped! Is it possible to get my messages folder back?

Don't worry. This is just a minor problem. Directly recover them by scanning your iPhone or extract the data from iTunes backup file or iCloud backup file, and you've done. The key is to find a trustworthy tool to help you get the data out of your phone. In other word, you need a recovery tool for iPhone data. I recommend a well-recognized program for you,iPhone Data Recovery. The Windows of this software allow you to recover text meassage from iPhone in three ways.
Download the free trial version below to have a try.


Directly recover deleted text messages from iPhone

Step 1 Launch the software & Find messages on iPhone

Run the program to your computer and connect your iPhone to your computer via USB cable. Then click "Start Scan" button in the window to find all of your files.

Note: For iPhone 4 and iPhone 3GS users, you also can switch to an Advanced Mode through the button at the lower-right corner. It's better for recovering media content.


Step 2 Preview & Recover iPhone text messages

You can see the result of scanning showing in the next window. Then choose the item of "Message" in the left column. You can preview the content one by one and mark those you want and click "Recover" to save them in your compute or in other devices.Besides, the deleted iMessage contents can be found too, including text, emoji and attachments.
                                       

------------------------------------------------------------------------------------------------------------------------------------------------------------------
More related articles:

How to recover lost/deleted data on iPhone 5/5S ?
How to recover lost or deleted contacts from iPhone 6/6 Plus/5/5s/4s
How to recover deleted iPhone data ?


Thursday, December 4, 2014

How to recover lost/deleted data on iPhone 5/5S ?


While, just as other mobile phone users, iPhone 5S owners have to face with the same problem of losing data after improper operations, system crashes or other accidents. As you know, iPhone 5S provides users with better experience of taking photos and videos, sending messages and enjoying various apps. After saving some precious pictures, videos and messages on your iPhone 5S, it must be a big blow to lose them without warning. In this situation, the most urgent thing you should do is to find ways to restore lost iPhone data.

To be honest, it is hardly to effectively avoid losing files from iPhone 5S. Then we have to turn to a data recovery tool. In this page, I’d love to recommend you iPhone 5S Data Recovery, which provides you how to completely recover lost data from your iPhone 5S. Now you can learn more from here.


Recover Data from iPhone after Restore via iCloud Backup

Step 1. Download and extract iCloud backup

After Launch the iPhone Data Recovery you needto Choose the mode – Recover from iCloud Backup Files,and input your account and password to login.


Step 2. Preview and recover data on iPhone after restore

Then download and scan will take you some time. Once it's done, you can get a scan result as follows. All data in the backup has been extracted and categorized. You can choose to preview any of them like photos, contacts, messages, and more. Tick the item you want and click "Recover" to save them on your computer with one click.


------------------------------------------------------------------------------------------------------------------------------------------------------------------

More information below:

How to recover lost or deleted contacts from iPhone 6/6 Plus/5/5s/4s