Saturday, January 17, 2015

iPhone 6 Plus Cannot Connect to PC? Tutorial for Green hand

iPhone 6 Plus fails to connect to PC? Connection fail can be caused by many reasons. The following paragraph helps you find way to solve this problem. Just read on.


1. You need to download iTunes in your computer firstly. Then connect your iPhone and your computer via USB cable.

2. After connection, iTunes will detect your device.

3. You can view contents of your iPhone in iTunes.

4. With iTunes, you can sync the data in your computer with your iPhone.

iPhone data recovery is a ios data recovery software for mac and windows that can recover any deleleted iphone/ipad/ipod data, such as recovery contacts, photos, sms and so on.

---------------------------------------------------------------------------------------------------------------------------------

More related articles:

How to Recover Deleted Photos from iPhone

Tuesday, January 13, 2015

How to Recover Deleted Photos from iPhone


You deleted photo accidently? Erase all your photos by clear up the storage space of your iPhone? Want to recover my photos immediately? It's time for Recovery Expert to help. There are there ways to solve this problem. It’s not difficult at all, as long as you follow the guide below, even you lost your phone. Check it out!

iPhone Data Recovery can recover deleted photos from iPhone. It actually supports most Apple products—iPhone 6/6 Plus/5 and all kinds of iPad. Check to download the tool first.


Here are the three easiest way to recover.

Solution 1: Use iTunes backup to recover pictures from iPhone 6 Plus/6/5S/5C/5/4S/4/3GS

Step 1: Choose iTunes backup and scan it.

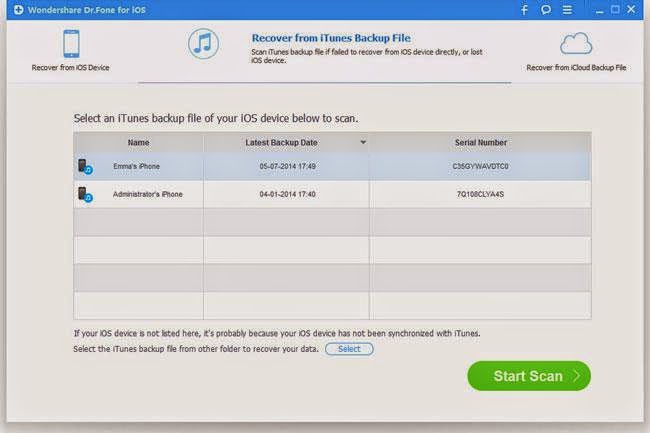
When you run the program on your PC, click "Recover from iTunes Backup File" on the top as the screen shot below. Choose the iTunes back up of your iPhone, if there are more than one back up, choose the "Latest Backup Data" and click "Start Scan".


Step 2: Recover from iTunes Backup File

After the scan is finished, all files in the backup file will be displayed for you to choose. You can preview the pictures both from camera roll and transferred from somewhere else. Mark all those you want and "Recover" it to save them to your computer.


The data extracted from backup file involve existing one and deleted before. You can separate them by chosen "Only display the deleted items".


Solution 2: Directly scan the iPhone and recover photos from iPhone 4/3GS

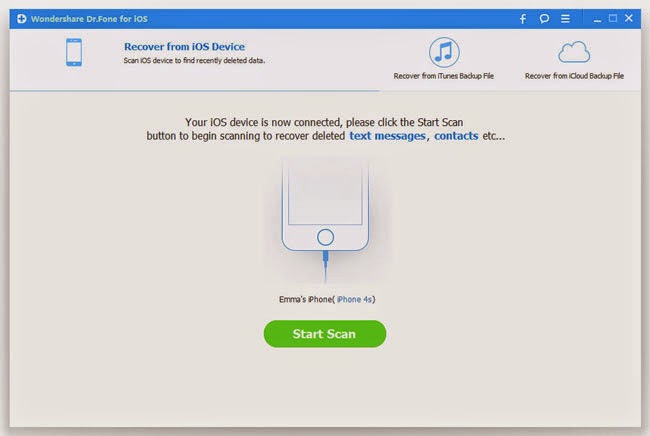
Step 1: Launch the program then connect your iPhone

This method is only for iPhone 4 and iPhone 3GS.If you are going to recover photos from iPhone iPhone 6, iPhone 6PLUS, iPhone 5 and iPhone 4S, please see 1nd Solution.

Run the program on your PC, then connect your iPhone 4/3GS to the computer. The screen shot as followed will be shown up.


Step 2: Recover your iPhone in the Scannig Mode

The way to enter scanning mode: Please carefully follow te 3-step instruction below in an exact way. (Your device screen will be black in scanning mode.)
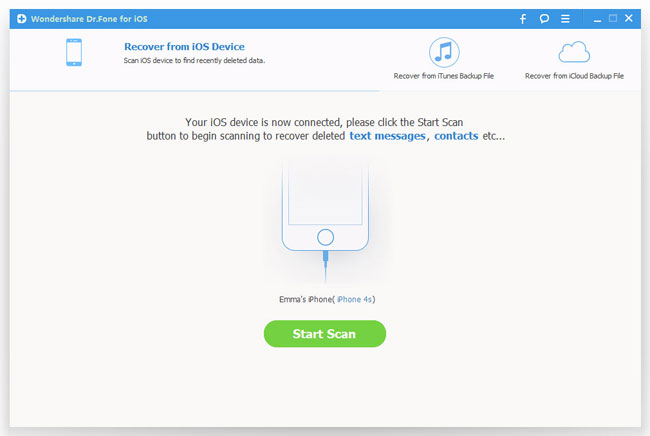
1. Connect your iPhone and click the green "Start" button on computer screen.
2. Press the "Home" and "Power" buttons of your iPhone at the same time and hold them for exactly 10 seconds.
3. After 10 seconds, you can release the "Power" button but keep pressing the "Home" button for another 15 seconds.
You've did it! When you're told that you've successfully entered the system, the program will automatically scan your iPhone data. Screen shot as follow.


Step 3: Preview to choose first and recover deleted photos from iphone

When the scan is finished, you can preview all found data in categories. To preview your photos, you can choose Photo Stream or Camera Roll. Not only those deleted pictures could be shown up, but also those Photo Stream still on your iPhone. If you only want to get those deleted photos back, you can refine the result by sliding the button in the red area on the interface below, to only display deleted items. Then mark those photos you want and click "Recover" to save them on your computer.


Solution 3: Take photos out from iCloud backup by iPhone recovery tool

This method can support iPhone 6 Plus, iPhone 6, iPhone 5s, iPhone 5c, iPhone 5, iPhone 4s, iPhone 4, iPhone 3GS and iPhone 3G.

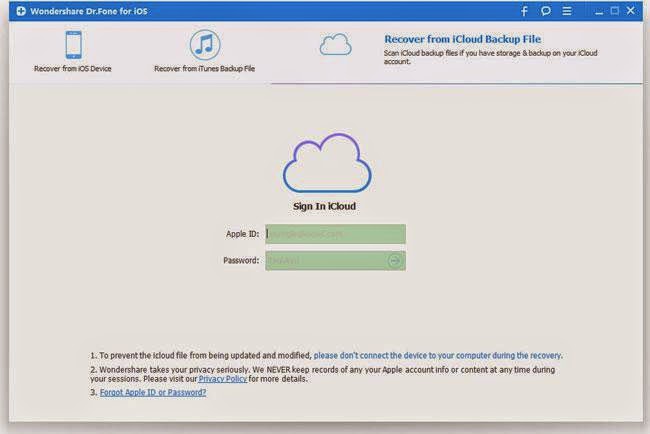
Step 1. Launch iPhone Recovery tool and sign in iCloud account.

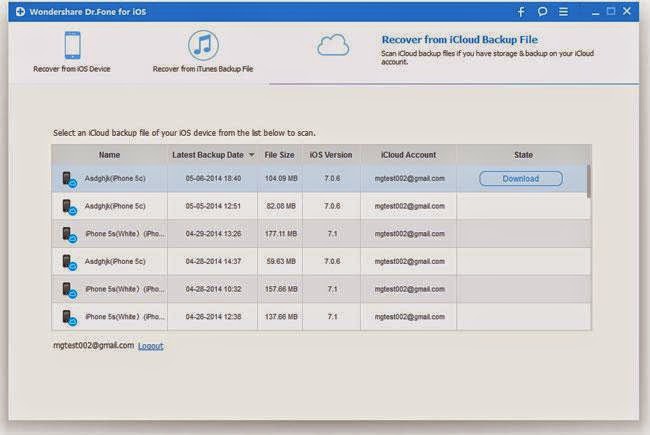
Install the iOS recovery on your PC, and choose "Recover from iCloud Backup File", and sign in your iCloud, you will get the interface below.


Step 2. Restore and save data from your iCloud

When you enter the log in your iCloud account, you can reach your backup automatically. Choose any data you want to recover, click "Download" button.


When it's complete, click the same button to start exporting, and you'll get the screenshot as below.


Step 3. Preview and save down photos from iCloud

Preview all the data first before you recover. You can find photos, contacts, message, notes, video etc. Choose whatever you want back, then restore them.


------------------------------------------------------------------------------------------------------------------------------------------

More related articles:

How to Retrieve Voice Memos from iPhone

How to Retrieve Voice Memos from iPhone


You recorded the meeting or training for reviewing later, but deleted it accidentally? Lost the sweet phone ringtone that recorded by your girlfriend, and wondering how to get it back? You found your voice memos gone after updated iOS version of your iPhone/iPad/iPod?
Well, if you have no idea, calm down. We have got the bravisimo way for you to retrieve your voice memos on Apple devices successfully. It's the iPhone Data Recovery program.

iPhone Data Recovery allows you to extract and preview iTunes backup data and selectively recover your voice memos. You can also scan your iOS devices directly by connected with computer via USB cable and recover voice memos without backup files.

Click the link below and download a free version on computer to try now!


Two Steps to Recover iPhone Voice Memos

Step 1. Scan iPhone or use iTunes backup file to recover

Install the program and connect your iPhone via USB cable to PC, you will get the interface as follow. Just begin by clicking the "Start Scan" button, simple enough. This is the mode of recovering from iOS devices.


Or, you can choose to Recover from iTunes Backup File. All your iTunes backup files could be found automatically as the following screen shot. Choose the one that you want to retrieve.


Step 2. Preview then recover deleted voice memos

The data will be listed in categories after scanning, you can mark those voice memos and M4A files you need to recover.


Moreover, you can also recover other data like photos, videos, contacts, messages, etc. from your backup file.
If you want to recover iPhone 4/3GS/ iPod touch 4/iPad 1, meanwhile you are a Windows user, you can use the program directly scan the voice memos on your device without iTunes backup.

-------------------------------------------------------------------------------------------------------------------------------------
More related articles:

How to Recover Deleted Notes from iPhone 6/6 Plus/5S/5/4S


Thursday, January 1, 2015

How to Recover Deleted Notes from iPhone 6/6 Plus/5S/5/4S


As we are entering a digital era, it is terrible for people to lose data. People may lose data due to accidental deletion, system crash, virus attack, and so on. In such a circumstance, data loss is inevitable. In case of data missing, you need a trustful data recovery tool which can save your data the first time you lose them. iPhone Data Recovery is worth a recommendation. No matter whether you have a backup of data, you can easily recover data with simple steps.

Download the free trial version below to have a try.


Three Solutions about Recovering Deleted Notes on iPhone 6/6 Plus/5S/5/4S

Solution 1: Directly Scan Your iPhone to Recover Deleted Notes (With No Backup)

Directly recover notes from iPhone 6Plus/6/5S/5C/5/4S/4/3GS/3G

If you don't have a data backup, this solution is useful for you. Follow the below steps to recover your notes.
Step 1. Run the program and connect your iPhone to the computer via USB cable. Choose "Recover from iOS Device" mode and click "Start Scan" button to find lost notes on it. 

Step 2. When the scanning process stops, all recoverable data will list in the window, and you can preview them before recovery. Then tick those you want to rescue and save them on your computer by using the "Recover" button at the lower-right corner.


Solution 2: Recover Deleted Notes from iTunes Backup

Recover only iPhone notes from iTunes backup

Step 1. Run the program and connect your iPhone to the computer via USB cable. Choose "Recover from iTunes Backup File" option on the top. Then select a backup file that you want to extract and preview. Click "Start Scan". 

Step 2. After scanning process finishes, you can preview all data extracted from the backup file. Click "Notes", and you can you read all notes and choose any item you want by clicking “Recover” button.


Solution 3: Recover iPhone Notes from iCloud Backup

Selectively recover iPhone notes from iCloud backup


Step 1. Run the program and choose "Recover from iCloud Backup File" in the window. Then sign in your iCloud account. 

Step 2. Choose one of your backup files for your iOS devices and download it to your computer. 

Step 3. After the backup file is downloaded, you can directly extract it by clicking "Scan". After it finishes scanning, you can preview all data extracted from the backup file. Click "Notes", and you can you read all notes and choose any item you want by clicking "Recover" button.


---------------------------------------------------------------------------------------------------------------------------------------------------------------
More related articles:

How to Retrieve Deleted Whatsapp Messages on iPhone